hey everyone!
today we're starting a new series calles „mani monday“ - hope you enjoy! :)
“ballet slippers“ from essie (basecoat), „chocolate cakes“ from essie (bottom),
maybelline „forever strong“ no.80 (middle),"big apple red" by o.p.i. (top) and the sponge im using is from the drugstore.
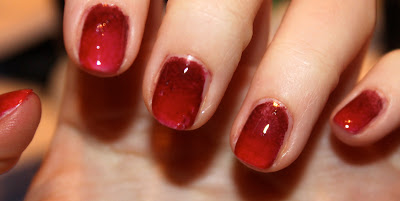
this is my first time trying to do ombre nails! i’m very excited and i hope they will turn out just great. so lets get started!
- i’m applying a basecoat from essie called „nourish me“ on to my nails to keep them healthy.
- then i’m appling two layers of the white nailpolish on all of my nails. this helps the colours to pop even brighter, once we've put them on.
- with a pair of sicssors i’m cutting the sponge into the right size, so it won't apply to much nailplish on my fingers.
- it's going to get messy and i’ll have to clean up my nails afterwards :( but here’s a trick to protecting the skin around the nail: put some duct tape on the skin around the nails so the nailpolish sticks to it and not the skin.
- now i’m putting my fall inspired nailpolishes on the sponge, in the pattern i want to have it. i’m using a brown, a dark red and a light red.
- let the fun begin! i’m pressing the sponge on to the nail and keep patting it on till the wonderful ombre pattern is perfect.
- step 5 and 6 have to be repeated on every single nail. this takes a while but it’s totally worth it!
- time to let the colours dry.
- to finish off the fall inspired ombre nails i’m using atop coat by essie called „good to go“ (favourite top coat ever!)
- my ombre nails are finished :)
I hope you found this helpul and inspring :) now its your turn, try some ombre nails of your
own! If you do, please be sure to send us some pictures on twitter or tell us about
your tips and tricks in the comments! so excited to see what you guys come up with!
xx -B


Keine Kommentare:
Kommentar veröffentlichen